14 Tips For Nano Banana Ai

If you’re looking to move beyond basic prompts and truly master the art of AI image creation, you’ve come to the right place.
Today, we’re diving deep into one of the most powerful image editing models available: Google’s Nano Banana.
This guide is built around a single concept “a valiant knight” to show you how every single one of these 14 tips can be used to build a rich, consistent, and dynamic visual story from a single starting point.
Tip 1. Build Consistent Worlds from a Single Image
This is perhaps Nano Banana’s greatest strength: its ability to maintain consistency.
You can start with a single image and build an entire world and narrative around a character.
The AI understands the context the character’s appearance, their armor, and their environment and uses it as a foundation for every new image you generate.
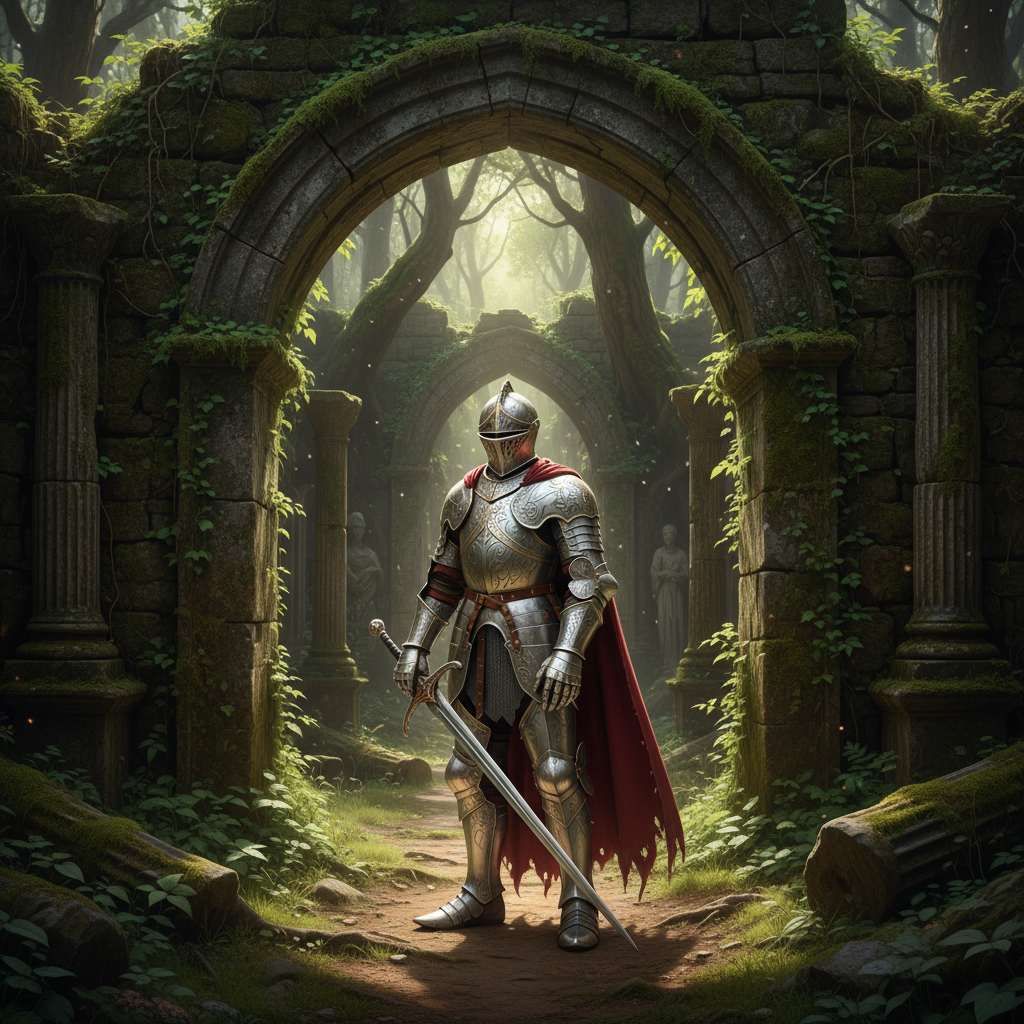
Let’s begin our saga with this image of a valiant knight in ornate silver armor standing before some ancient ruins.
[start with this : Image of a knight in detailed silver armor at the entrance of mossy stone ruins.]
 From this single starting point, we can create a sequence of events. He’s arrived, now what happens? Let’s have him prepare for battle.
Prompt: create an image of this knight drawing his gleaming sword from its scabbard, his expression is determined
[Placeholder: Image of the same knight, now holding his sword in a ready stance. The armor and background ruins remain consistent.]
As you can see, the model keeps the knight’s unique armor and the style of the ruins remarkably consistent. We can escalate the action further. An unseen threat emerges!
Prompt: create an image of this knight fighting a large, fire-breathing dragon in the courtyard of the ruins
[Placeholder: Image of the same knight in a dynamic pose, battling a dragon. The armor, sword, and architectural style of the ruins are all consistent with the previous images.]
This ability to build out scenes while retaining character and environmental integrity is a game-changer for visual storytelling.
Tip 2. How to Get Watermark-Free Images
When you generate images directly within Google’s apps like Gemini or AI Studio, you’ll notice a small, diamond-shaped watermark on your creations. To generate clean, watermark-free images, you’ll need to use a third-party platform that has integrated Nano Banana.
My platform of choice is OpenArt.ai. It consolidates various AI tools into one place. To use Nano Banana there, navigate to the “Chat to Edit” feature. This tool allows you to upload an image and use simple chat prompts to make changes, and the best part is, the images you create here won’t have a watermark.
Tip 3. Change Backgrounds the Right Way
A common task in image editing is changing the background. However, a simple prompt often leads to poor, unrealistic results. If you just tell the AI to “change the background,” you’ll get something that looks like a cheap cut-and-paste job.
The key is to give the AI context and intent. Instead of just swapping a background, describe the entire scene you want to create. Using our knight:
-
Don’t do this:
change the background to a fiery volcano -
Do this instead:
create a cinematic scene of the knight standing defiantly before the entrance to a fiery volcano, with heat haze distorting the air and embers floating around him.
[Placeholder: Side-by-side comparison. Left: The knight awkwardly pasted onto a volcano backdrop. Right: The knight seamlessly integrated into a volcanic scene, with realistic heat glow and atmospheric effects.]
By framing your prompt as creating a “cinematic scene,” you’re telling the AI to integrate the subject properly, including matching the lighting and shadows to the new environment.
Tip 4. Understand Segmentation Masks to Edit with Precision
To truly control your edits, you need to understand how Nano Banana “sees” your image. It uses segmentation to identify and separate every object in the scene.
[Placeholder: Image showing the knight on the left, and the AI's segmentation mask visualization on the right, with the knight, his sword, the sky, and the ruins all colored differently.]
Knowing this, you can target specific segments with your prompts. For example, let’s say we want to change his armor material without affecting anything else.
Prompt: change the knight's silver armor to a dark, matte black armor. keep everything else exactly the same
The AI will isolate the “armor” segment and apply the changes only there, leaving the knight’s face, sword, and the entire background untouched.
Tip 5. The Challenge of Combining Multiple, Separate References
What if you want to create a scene with your knight, but also include a specific-looking dragon and a magical artifact from different images? This is where many AI models struggle. Feeding the AI multiple separate images often results in a confused, low-quality composite.
Tip 6. The Solution: Use Reference Collages
The best way to combine multiple elements is to create a reference collage. Instead of providing separate files, you’ll create a single image that contains all the elements you want to include. It’s like giving the AI a visual blueprint.
[Placeholder: A collage image on a white background showing our knight, a specific dragon, a magical sword, and an ancient castle.]
By putting everything into one reference image, you give Nano Banana a complete picture of all the assets. Now you can write a detailed prompt describing how they should interact. The results will be far more consistent and high-quality.
Tip 7. You Are in Control of the Aspect Ratio
This is a simple but crucial rule: Nano Banana will generate an image in the same aspect ratio as your reference image. If you want a wide, cinematic 16:9 shot of your knight, you must use a horizontal 16:9 reference image. If your character reference is a tall, vertical image, simply place it on a wide, blank canvas and use that collage as your reference to get a wide final image.
Tip 8. Expanding Images with a Simple Trick (Outpainting)
Nano Banana doesn’t have a built-in “outpainting” feature. But there’s an easy workaround.
-
Take your original image (e.g., a square close-up of the knight).
-
Place it onto a larger, blank canvas (e.g., a white 16:9 image).
-
Upload this new canvas as your reference image.
-
Use a prompt like this:
Prompt: expand this photo of the knight to fill in the white area. He is standing in a vast, grassy field at dawn. Keep the character in the same location.
[Placeholder: A square image of the knight in the middle of a large white canvas, with an arrow pointing to the final, fully rendered wide-angle scene showing the full field.]
The AI will intelligently fill in the blank space, expanding the world around your subject in a coherent way.
Tip 9. Guide the AI with Annotation References
For ultimate compositional control, you can annotate your reference image with text and arrows. This is like giving the AI a director’s storyboard.
[Placeholder: An image of the knight on a white canvas, with text and arrows pointing to different areas saying "put an ancient temple here," "put a mysterious stone well in the foreground here," and "put a dragon flying in the distance here."]
This tells the AI not just what to add, but exactly where to put it.
Tip 10. Go One Step Further: Annotate with Images
You can combine the collage and annotation methods. Instead of just using a text label like “dragon,” you can paste a small image of the specific dragon you want into that location on your reference canvas. This provides a direct visual cue for the style and design you’re looking for.
Tip 11. Become a Master of Lighting
Lighting determines the mood, and with Nano Banana, you are the lighting director.
Let’s take our original image of the knight at the ruins, which is set in neutral daylight.
[Placeholder: Image of the knight in detailed silver armor at the entrance of mossy stone ruins.]
Now, let’s change the mood to something more magical and mysterious.
Prompt: change the lighting of this scene to a spooky, moonlit night. Add a magical blue glow emanating from the entrance of the ruin.
[Placeholder: The same knight and ruins scene, but now it is night, with a strong blue moonlight and a magical glow coming from the doorway.]
The structure of the scene remains, but the feeling is completely transformed.
Tip 12. Integrate Logos and Text Seamlessly
Nano Banana is exceptionally good at handling text. You can add insignia to your knight’s armor or shield.
Let’s start with our knight and a logo for a royal crest.
[Placeholder: Side-by-side images of the knight's chest plate and a logo of a golden lion.]
Prompt: add the golden lion royal crest onto the center of the knight's chest plate. Make it look like embossed metal and adjust the lighting to match the armor.
[Placeholder: A close-up of the knight's chest, now featuring the golden lion crest realistically embossed onto the metal.]
The AI doesn’t just paste the logo; it understands the surface and integrates it with the correct texture, lighting, and perspective.
Tip 13. Direct the Action with Camera Angles
You can bring your static images to life by prompting for different camera angles. Starting with our base image of the knight, you can generate an entire sequence of shots.
[Placeholder: The original medium shot of the knight in front of the ruins.]
From this, you can ask for:
-
A close-up:
create a photo of a closeup shot on the knight's helmet -
A low-angle shot:
create a photo of this scene taken from a fullbody shot, low angle hero shot from below the knight. He is wearing leather boots.(Mentioning footwear encourages a full-body shot!) -
A high-angle shot:
create a photo of this scene taken from a bird's eye view shot above the knight, showing him standing alone in the ruin's courtyard.
This allows you to build a dynamic shot list for your story, all from one consistent scene.
Tip 14. From Still Images to Cinematic AI Video Transitions
This is where everything comes together. You can take the consistent scenes and varied camera angles you’ve created and stitch them together into a seamless AI video.
Using an AI video tool that supports a “start frame” and “end frame” feature (like the one in OpenArt), you can upload two different images from your scene.
[Placeholder: Side-by-side images showing the "Start Frame" (knight at ruin entrance) and "End Frame" (knight deep inside the ruin, holding a torch).]
Then, you can prompt the AI video generator with a simple instruction that describes the action:
Prompt: The camera follows the knight as he walks from the sunlit entrance into the dark, torchlit corridor of the ruins.
The AI will generate a video that fluidly transitions from the first shot to the second, creating a smooth camera movement that brings your story to life.
This technique unlocks the potential to create truly cinematic AI videos, turning your collection of static images into a living, breathing narrative.
By mastering these 14 tips, you’ll be well on your way to creating stunning, consistent, and highly-controlled AI art with Google’s Nano Banana.
Now go create your own saga